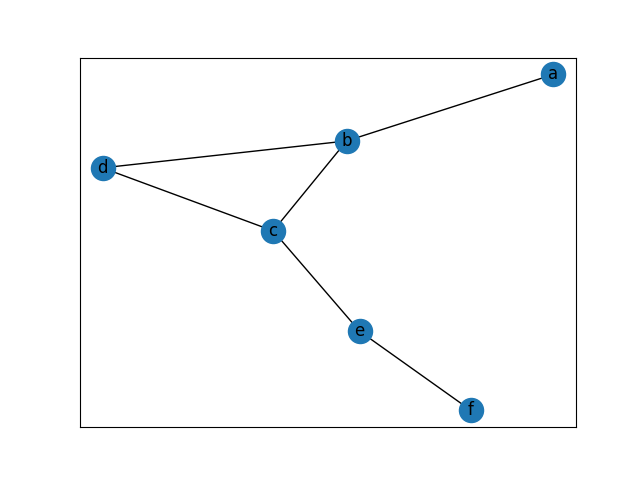
基本情報技術者試験 無向グラフをPythonのNetworkXで描く
import matplotlib.pyplot as plt
import networkx as nx

# 無向グラフの作成
G = nx.Graph()

# 頂点の追加
G.add_nodes_from(['a', 'b', 'c', 'd', 'e', 'f'])

# 辺の追加
G.add_edges_from([('a', 'b'), ('b', 'c'), ('b', 'd'), ('c', 'd'), ('c', 'e'), ('e', 'f')])

# グラフの描画
nx.draw_networkx(G)
plt.show()
基本情報技術者試験 10進数を2進数に変換するプログラム
与えられた10進数を8桁の2進数に変換するプログラム
生成する2進数は文字列
C
#include <stdio.h>

#define DIGIT 8

void conv_dec_to_bin(int dec, char *bin) {
  int i;

  for (i = DIGIT - 1; i >= 0; i--) {
    bin[i] = dec % 2 + '0';
    dec /= 2;
  }
}

int main() {
  char bin[] = "00000000";
  int i;

  for (i = 0; i < 256; i++) {
    conv_dec_to_bin(i, bin);
    printf("%3d, %s\n", i, bin);
  }

  return 0;
}
def conv_dec_to_bin(dec):
    bin = []
    for _ in range(8):
        dec, mod = divmod(dec, 2)
        bin.append(mod)
    bin.reverse()
    bin = "".join(map(str, bin))
    return bin

for i in range(256):
    print(i, conv_dec_to_bin(i))
gdbserverの使い方
デバッグするプログラムを「prog」とする。
ポート番号を「12345」とする。これは適当なものでよい。
$ gdbserver localhost:12345 ./prog
もう一つターミナルを起動して下記のコマンドを実行する。
$ gdb ./prog
Reading symbols from ./prog...done.
(gdb) target extended-remote localhost:12345
Remote debugging using localhost:12345
gdbserverを終了させるには、gdbserverではなくgdbのほうで下記のコマンドを実行する。
gdbを終了させる前に実行する。gdbを終了させてしまった場合は再度上記のコマンドを実行してgdbserverに再接続して実行すればよい。
(gdb) monitor exit
(gdb) q
Remote connection closed
Linuxカーネルのソースコードの解凍
下記のサイトからソースコードをダウンロードする。
「Latest Release」というボタンをクリックする。
The Linux Kernel Archives

下記のコマンドを実行する。
$ xz -dv linux-5.11.11.tar.xz
$ tar -xvf linux-5.11.11.tar
NASM入門 puts
global main
extern puts

section .text
main:
  mov rdi, message
  call puts wrt ..plt
  ret
message: db "hola", 0
nasm -felf64 hola.asm
gcc -o hola hola.o
NASM入門 Hello,World
global _start

section .text
_start:
  mov rax, 1  ;システムコールをwriteに設定
  mov rdi, 1  ;出力先をstdoutに設定
  mov rsi, message  ;出力する文字列の先頭アドレスを設定
  mov rdx, 13  ;出力する文字列のバイト数を設定
  syscall  ;システムコールを実行
  mov rax, 60  ;システムコールをexitに設定
  xor rdi, rdi  ;exitのコードを0に設定
  syscall  ;システムコールを実行

section .data
message: db "Hello, World", 10  ;出力する文字列 最後の10は改行(LF)
nasm -felf64 hello.asm
ld -o hello hello.o
./hello